Showing posts with label garlic. Show all posts

Sunday, June 23, 2013

Marinara sauce

Today was a big cooking day. 

Yesterday I went to the farmer's market and picked up a haul -and not just produce, either. After lunch with a friend, I bought some gourmet olive oil - from a store called "Ah Love Oil". It was blood orange infused and I was sold as soon as the assistant mentioned that she makes almond coffee cake using it.

So this morning I made blueberry muffins from scratch using the blood orange olive oil and almond extract. They have a sugar/cinnamon/flour/butter crumb topping.  I already posted this recipe.

Lunch was:
Salmon with a generous helping of olive oil, kosher salt, and pepper. In a baking pan, 30 minutes at 375.
Corn on the cob, in tin foil, olive oil/salt/pepper and wrapped up. In oven next to baking pan.
Lotta fresh squeezed lemon on the salmon when it came out.

Now,  I am making marinara sauce from those gorgeous tomatoes I bought yesterday.

I cut them up while olive oil and a whole lotta garlic was simmering.  A whole lotta means almost an entire small jar of the minced garlic in olive oil. 

I also threw in a handful of the sweet cherries I bought yesterday, also cut up, instead of any sugar.    Douse it good with white wine.  I think I used almost 3/4 of a cup.  I just poured.

So:

Olive oil, a whole lotta garlic, white wine, tomatoes, and the sweet cherries and it's all simmering down. I should have bought some bread, I forgot. That would be great on crusty bread.

MMMMMM

Monday, June 3, 2013

Santa Fe Chicken Chili (Gluten Free Goddess)

Good morning!  Long time no post. 

I don't have gluten issues, to my knowledge, but a coworker does and she raved about this to me.  So, last week I decided to give it a try.  It's very easy, and I wonder if it would be even easier if you baked the yam ahead of time - easier cutting.  I liked it a lot and the yam is a nice touch.  Don't forget to get FIRE ROASTED tomatoes, not regular diced tomatoes.

I have to wonder though - isn't chili pretty much gluten free anyway?

http://glutenfreegoddess.blogspot.com/2006/01/santa-fe-chicken-chili.html

Copied directly:
You can easily make this recipe in your favorite slow cooker or Crock Pot, following manufacturer's instructions for chili or soup using cooked (canned) beans. Add the cooked chicken and lime juice near the end of cooking time, to keep it tender and fresh tasting. Vegans take note: make this vegan with your favorite veggie "sausage" or crumbled "burger" instead of chicken.

Ingredients:
1 tablespoon extra virgin olive oil
1 medium sweet onion, diced
4 cloves garlic, minced
1/2-1 teaspoon ground cumin, to taste
1/4-1 teaspoon ground cayenne or chipotle pepper, to taste
1 sweet potato, peeled, diced
2 15-oz. cans pinto or white beans, rinsed, drained
1 28-oz. can Muir Glen Organic Fire Roasted Tomatoes, with juice
8-oz. (1 cup) chopped roasted green chilies- mild or hot
2 cups chicken broth, more if needed
1 tablespoon balsamic or apple cider vinegar
A small drizzle of agave
2 heaping cups cooked chicken pieces- hand torn looks nice
Juice of 1 lime, or to taste

Instructions:
Heat a large pot over medium-high heat and warm the olive oil; cook the onions until they are soft and translucent. Add the garlic and spices and stir for a minute.

Add the diced sweet potato, beans, tomatoes, green chiles, broth, balsamic vinegar, and agave. Stir gently to combine it all.

Bring it to a simmer and lower the heat; cover and cook the chili for 30 minutes or so until the sweet potatoes are tender. Add a touch more liquid if you need to. Add the cooked chicken and some lime juice.

Taste test and adjust the seasonings - more heat? More lime? A tad more sweetness? Good chili has a balance of these flavors.

Warm through and serve when you are ready.

If the chili thickens too much thin it with broth; if the chili becomes too thin cook it longer with the lid off to reduce the liquid.


Saturday, May 8, 2010

Easy Peasy Carrot Fennel Soup

I did a little bit of searching before I settled on this recipe.  The primary reason for my selection was because once I bought the fennel, I already had all of the other ingredients.  I was inspired to try this interesting combo by an old Books for Cooks recipe (book bought in London, in a little book shop in Notting Hill across the street from the travel book shop in The Movie) and then did some searching on the internet.  During that search I did in fact find another really interesting food blog, "My Man's Belly", which is now in my hall of fame to the right, too.  I plan to try Pamela's soup as well.  As always, if I vary the recipe, I write that far below. 
Ingredients


2 tablespoons unsalted butter
1 medium fennel bulb, trimmed and thinly sliced; fronds reserved
1 1/2 pounds carrots, peeled and thickly sliced
1 large garlic clove, thinly sliced
1 teaspoon salt, or to taste
1/3 cup fresh orange juice
1/4 cup sour cream
Freshly ground black pepper, to taste

Preparation

1.  In a 3-quart heavy saucepan, over medium heat, melt the butter until foamy. Add the fennel slices and cook, stirring, until softened. Add the carrots and garlic and cook another minute. Pour in 6 cups of water and season with salt. Simmer, covered, until the carrots are very tender, about 20 minutes.

2.  Remove the soup from the heat and stir in the orange juice, sour cream and reserved fennel fronds. Use the back of a spoon to mash some of the carrots and fennel, but leave the soup chunky. Season with salt and pepper.

http://events.nytimes.com/recipes/1772/2001/12/09/Carrot-and-Fennel-Soup/recipe.html

My changes:

Less water (4 cups) and in fact I was sorely tempted to use chicken stock but thought I'd give the actual recipe a shot first. 
Pre-cut thinly sliced carrots. 
Pre-minced garlic in a glass bottle (you know the kind).  In fact I also forgot to stir the darn stuff in the fennel/butter mixture which would have been better - I literally added it about 20 minutes into the last stage - the water reduction stage.
TIME:  I bet I had this simmering for an hour and a half.  I think the writer was nuts - 20 minutes would do nothing to those carrots, even the thin ones.  Let it simmer on down!
Probably closer to half a cup of sour cream.

I was skeptical, thinking it would be bland (water?) but it was actually very tasty.  This was even without settling overnight.  I am sure it will be even better tomorrow!

Let me know if you try it, I think you will like it.

(NUMBER SIXTEEN in 2010)

Monday, May 3, 2010

I'm keen for Quinoa


Which must be like saying "I'm Cuckoo for Cocoa Puffs" but in a more mature way.

That is the theory, at least.  It's bubbling downstairs, I'll soon take a bite.  This is a slight break from Five Easy Pieces - to resume later this week.


Here is the recipe:

Baked Quinoa With Spinach and Cheese


By MARTHA ROSE SHULMAN for the NYTimes

1 6-ounce bag baby spinach
2 tablespoons extra virgin olive oil
1 medium onion, chopped
2 plump garlic cloves, minced
4 cups cooked quinoa, (1 cup uncooked)
2 large eggs
3 ounces Gruyère cheese, grated (3/4 cup)
1 1/2 teaspoons chopped fresh sage
1 ounce Parmesan, grated (1/4 cup)

1. Preheat the oven to 400ºF. Oil a 2-quart gratin or baking dish.
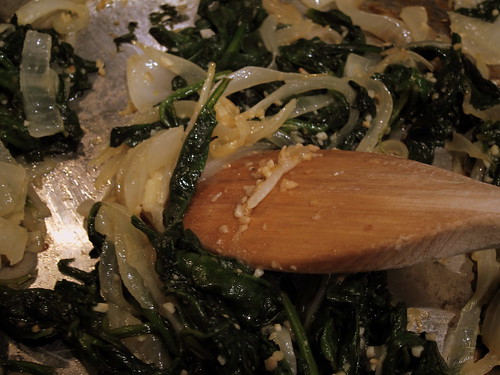
2. Heat a medium frying pan or a wide saucepan over medium-high heat. Wash the spinach and without spinning dry, add to the pan and wilt in the liquid left on the leaves after washing. You may have to do this in 2 batches. As soon as the spinach wilts, remove from the heat and rinse with cold water. Squeeze dry and chop. Set aside.
3. Wipe the pan dry and heat 1 tablespoon of the olive oil in it over medium heat. Add the onion and cook, stirring often, until tender, about 5 minutes. Add the garlic and stir with the onion until fragrant, about 1 minute. Stir in the spinach and season with salt and pepper. Remove from the heat.
4. Beat the eggs in a large bowl and add 1/2 teaspoon salt. Stir in the quinoa, the onion and spinach mixture, the Gruyère, and the sage. Add freshly ground pepper and stir the mixture together. Scrape into the gratin dish. Sprinkle the Parmesan over the top and drizzle on the remaining tablespoon of olive oil. Place in the oven and bake until nicely browned on top, about 25 minutes. Remove from the heat, allow to sit for about 5 minutes, and serve.

Advance preparation: The cooked quinoa will keep for 3 or 4 days in the refrigerator. The recipe can be made through Step 3 several hours or even a day ahead. The gratin can be assembled several hours ahead.


The verdict?  On paper, it looks like it should be amazing.  It's not bad, but something is missing.  It's a little bland.  Maybe the spinach makes it taste too healthy (or the quinoa). 

The recipe called for salt and I didn't use it (I figured I could do that afterwards if I wanted it) and perhaps cooking with salt (instead of sprinkling it on after) is important... also, I forgot until the last second that I needed to rinse the quinoa and I don't think I managed to strain it adequately afterwards and as a result I think there was too much water - I may have overcooked it a little. I ended up straining the result! I know you are supposed to cook it until it's fluffy like rice. Next time I am buying a sieve - colanders have big holes.

It wasn't bad, it just wasn't what I expected. I already doled out my portion for lunch so we'll see if settling overnight helped to set the flavors in.  Also, I work with a number of Peruvians, I'll inquire with the experts.

Next day:  leftovers were much, much better.


(NUMBER FIFTEEN in 2010)

Sunday, April 25, 2010

Five Easy Pieces II

Part two of Five Easy Pieces - but can I keep up the pace until I am through?  It's easy on the weekends, and especially when I've got kitty-watch detail both days (I took them in to the vet for their annual vaccinations which means staying home to watch them for a few hours afterwards - one at a time).

Today for lunch was another easy-peasy "salad".  Also taken from the NYTimes Minimalist Mark Bittman, this recipe is a peanut sauce intended to be tossed with cold noodles.  Here are most of the assembled ingredients:


Here is the recipe:

87. Cold not-sesame noodles: Combine about a half-cup peanut butter with a tablespoon soy sauce and enough coconut milk to make the mixture creamy (about a half cup), along with garlic and chili flakes in a blender or food processor. Toss sauce with cooked and cooled noodles, a load of mint, Thai basil, and/or cilantro, and lime juice. Shredded cucumber and carrots optional.

I used chili oil from the Asian food aisle as I could not find chili flakes anywhere.  Trust me, this oil will get the point across.  I wish I had bought carrots.  I've got cilantro for the topping.

The verdict:  VERY creamy sauce.  The coconut milk really helps to un-stick the peanut butter.  That said, the peanut butter was still clearly very dominant even with the other strong ingredients.  I think it could use a tad more chili oil and soy sauce.  The cilantro was a nice touch.  I have enough leftovers for at least 3 other meals I would say.

Here are photos of my kitties who keep me on the straight and narrow:


(NUMBER TWELVE in 2010)

Sunday, January 24, 2010

I blame it on Gordon. Ramsay, that is.

Sometimes, you have to remind yourself why some foods are not to your liking...

And so I bought a half pound of very fresh (squeaking fresh) scallops. 

Why did I do this, I wonder.  It's been years since I had scallops - and I do mean years.  I may not have been living in Virginia, as a matter of fact - it was that long ago.  I'm just not a fishy-fishy-fish person. 

I believe it was because I saw one Gordon Ramsay program which showcased him teaching a protege how to make scallops in his restaurant.  I was fascinated.  He held up the plate of scallops and sprinkled some kind of fairy dust on it from arms-length.  So artful!  Let me describe:  he held the plate in one hand, and a handful of magic in the other hand.  Whiff whiff whiff, hand held almost to his shoulder height,  with deft flicks of the wrist he lightly coated the scallops and then set about pan searing them.  He is such a perfectionist he actually threw out a few servings before producing one for the clientele.  Not because they would have tasted bad, but because the presentation was imperfect.  So in the garbage they went and he made his protege start from scratch.

I'm so impressionable.  The image stayed with me and I finally took the plunge and bought some fresh scallops.  Here is what I did:

Half pound of scallops.
2-3 T EVOO.
A heaping T of minced garlic in oil.  You can find small bottles of this in the produce section.

I put several T of pan searing flour into a baggie and shook the scallops in the sealed bag.  OK, OK, Gordon Ramsay I am not.  I have to walk before I can run, people!

The heat should be on medium-high and you want the oil to be nice and hot in the skillet. I ladled on the garlic and spread it around while the oil heated up. 

I artfully arranged the pieces in the skillet and watched over them.  After they started looking a little brown I flipped them and watched again.  When they were done I turned off the heat and put 'em on a plate and squirted a little lemon juice on them.

Sigh.  They looked perfectly scrumptious.  While I certainly wouldn't say they tasted disgusting I just don't care for the taste that much.  They were of a perfect texture and melted in my mouth.  I just am not a fan.

Maybe I should try a different recipe?  File this under "a great idea, too bad about the fish".

(NUMBER THREE in 2010)

Saturday, October 4, 2008

Creamy Gorgonzola Fettuccine


Cows near Heiligenblut
Originally uploaded by Skyhawk Flyer
Friday afternoon, half an hour before I leave work: what do I want to eat tonight? For some reason the first thing that came to mind was pasta in a creamy gorgonzola/walnut sauce. I googled the words and the below recipe came up. This recipe was in Cooking Light in 2000. Below is the recipe and far below is what I actually did. Why do I have a photo of cows, you ask? Well, Gorgonzola is a cheese from cows.

Creamy Gorgonzola Fettuccine
8 ounces uncooked fettuccine
3 cups (1-inch) diagonally sliced asparagus (about 10 ounces)
2 teaspoons butter or stick margarine
4 garlic cloves, minced
1 tablespoon all-purpose flour
1 1/4 cups fat-free milk
1/4 cup (2 ounces)
1/3-less-fat cream cheese
1/4 teaspoon salt
1/2 cup (2 ounces) Gorgonzola or other blue cheese, crumbled
2 tablespoons chopped walnuts, toasted
Freshly ground black pepper (optional)

Cook pasta in boiling water 6 minutes, omitting salt and fat. Add asparagus, and cook 2 minutes or until tender.

While pasta is cooking, melt butter in a medium saucepan over medium-high heat. Add garlic, and cook for 3 minutes. Add flour; cook 30 seconds, stirring constantly. Gradually add milk, stirring well with a whisk. Stir in cream cheese and salt; cook 3 minutes or until thick, stirring constantly.

Drain pasta and asparagus; place in a large bowl. Add sauce; tossing to coat. Serve with Gorgonzola and walnuts, and sprinkle with pepper, if desired.

What I did:

For starters, I bought asparagus (Spargel! white asparagus) and maybe the first clue should have been that buying it in October isn't likely to yield high quality. The first thing I did was to start to prep it, and after cutting roughly 1/4 of the bunch I tasted a few slices and literally spit them out. Too bitter! I wasn't about to gamble on all this food and cook them anyway in the hopes that they would taste better after cooking. In the garbage they went. It is a shame...

Because the fettucine was 12 oz and not 8 I decided to enlarge the sauce ingredients slightly. 3T of butter, for instance. 2T of flour, maybe even a little more. 1.5 cups of milk - 2%. 3 oz of cream cheese (the only thing that was light in this entire recipe!). 3/4 of a cup of gorgonzola cheese. I also stirred the cheese directly into the milk/butter/cream cheese combo which was cooking. I didn't think merely crumbling it on top would be the same effect - I wanted sauce! I didn't toast the walnuts. That may be a good idea.

I now have an entire 2 cup container of gorgonzola sauce in the fridge, even after having my meal last night. It was very good, and scratched my itch. (Now what am I going to do with all that sauce??)

Sunday, September 21, 2008

Jack talk Thai! Chicken and Basil


Simmering coconut milk
Originally uploaded by Skyhawk Flyer
Here is another recipe from the book "One year at Books for Cooks Vol. 3".

I just realized, however, in writing this blog (food already eaten, dishwasher humming) that I completely forgot the "basil" step. Basil and garlic, slightly stir fried in sesame oil, as a matter of fact. Oops.

At any rate, here is the recipe and my variations below:
Thai Chicken with Basil
4 chicken breasts (skinned and boned).
8 fl oz/1 cup chicken stock
8 fl oz/1 cup coconut milk
1 fresh red chili, seeded and finely chopped
1 star anise
1 t ground coriander
salt
3 oz skinned unsalted peanuts
1 t sesame oil
2 garlic cloves, peeled and finely chopped
2 handfuls of basil leaves

Cut the chicken breasts across on a sharp diagonal into 1 inch strips. Put the stock, coconut milk and spices into a pan and bring to a boil. Simmer for 10 mins and the sauce should reduce by half.

Toast the peanuts in a dry pan over slow heat until nutty and golden. Stir the chicken strips into the sauce and cook gently until white, tender and cooked through. Take off the heat and adjust the seasoning.

Heat the oil and fry the garlic. When it starts to color and crisp, throw in the basil and stir fry until wilted. Stir the garlic-basil into the coconut and serve at once with saffron rice, garnished with toasted peanuts.

Sounds marvelous doesn't it? That basil garlic would have been a really nice touch.

What I did differently:

1 can each of chicken stock and coconut milk - in other words, roughly double the amount.
I bought dried chiles in a bag and threw three of them in the sauce while cooking. It didn't seem to do anything.
I bought anise seeds - in a spice jar.
I bought ground cilantro (coriander) in a spice jar.
Completely forgot to do the last bit.

It was pretty good, if a bit bland. The chili didn't juice it up, and the last part of the recipe would also have been good.

Anyway, I now have a few lunches and dinner this week.

Sunday, September 14, 2008

Cooking with a laptop - Tomato Spinach Tart

Literally!

I found a great blog called the Whistlestop Cafe Cooking. Sandi and Bill own the Whistlestop Cafe in Alabama and she has a great blog about her cooking.

I decided to make her Tomato Tart, and in order to do so had to put my laptop on the kitchen counter to follow her recipe while I cooked. Since I like to have either a glass of wine or a glass of beer while I cook, I had to be extra careful. (My beer of choice today was a Franziskaner Weissbier).

Her blog is here: http://whistlestopcooking.blogspot.com/

And her recipe is here:

http://whistlestopcooking.blogspot.com/2008/09/tomato-tart.html


Here is the recipe in written form.

Tomato and Spinach Tart
1 bag spinach
1-2 tomatoes
2 cloves garlic
1 small sliced onion
1/2 cup sour cream (low fat)
2 eggs
1/2 cup milk
1 cup grated cheese
1 pie crust
Bake at 350°
Press pie crust into a large tart pan. Combine coarsely chopped spinach with onion and garlic. Stir in sour cream and most of the cheese. Press into the tart. Combine eggs, milk, salt and pepper. Pour over the spinach. Top with slices of tomato and sprinkle with more cheese. Bake for 35-40 minutes. Allow to sit for 15 minutes before slicing.

I can't wait to take it out of the oven! I used Asiago cheese this go around. I also had to make two, because the above is more than it seems (I used pre-made pie crusts, not a tart baker) so I ended up using 2 eggs and a half cup of milk for each one.

In other news, yesterday I went to the annual art show in Old Town Alexandria and came home with (surprise) more pottery. This is a beautiful hand thrown and hand painted bowl which is now gracing my counter as a fruit and veg holder. Here it is:


Additionally, my new-found determination to actually cook versus eat at restaurants or other no-brainer food is making real inroads into my eating habits.

Last week, in addition to the Cranberry Chicken below, I also made haddock (pop in the oven at 425 for half an hour, two pats of butter and a lot of lemon juice) with a side of my own recipe I call Lazy Noodles.

Lazy Noodles:

Chicken stock in a can
One cup of water
Egg Noodles
Frozen peas.

Boil the liquid. Add a whole bunch of noodles. I mean, pack 'em in. Turn heat to medium and cover. After 5-6 minutes add in some peas. Maybe half a cup or more. After a few more minutes, it's done. Do not drain. It is not quite soup, not quite "stew", but it sure is good.

My other home cooked meal, which I had twice last week (lazy, lazy) was a Brie and Cherry Jam Grilled Cheese Sandwich. The bread slices were the large size so believe me, I was full after I ate just that for dinner with a glass of milk.
Related Posts with Thumbnails